
I've Moved...Go Here...

Showing posts with label Recipes. Show all posts

Monday, March 29, 2010

Menu Mondays: Mexico's Gift To America- Pozole

(the above is a chicken pozole with very little meat, not how I usually make it)
We moved to this small California town nearly 5 years ago. It's heavy with Mexican culture. The majority of the kids in my children's classes are first generation. Though I have my political opinions on the massive flood of immigration into this state and how it's really bleeding us dry, there are many things I've learned about this culture from living here and having our kids in school. Many of the families we know are hard working people really doing their part to become part of the American society while still respecting their heritage. More than anything, Taco Bell becomes a cheap (literally) joke when you get to taste some of their authentic cooking.


Last year, Princess was in her first year of public school transitioned from homeshooling. She was in 5th grade and Rick and I tried to be as involved as we could. Her teacher did a few holiday occasions by having a lunch pot luck in the classroom. Since most of the families were Hispanic, the foods were as well. This was how I came to have my first bowl of Pozole. Pozole is kind of a sister to the Menudo soup but I'm not into eating tripe (in fact, I find it funny that many times cooked tripe is pictured with beer or other alcohol and yep, that's what it would take for me to eat it, way more than I'm willing to drink) so I prefer this one.


It was rustic, brothy and OH, so tasty.


(next segment is read at your own risk...)


Historically Pozole has a very pagan and disgusting origin. It was a soup made for special ceremonial occasions that took place after human sacrifices. It's 2 main ingredients were corn (more specifically hominy), which was sacred to the ancient Mexicans since they believed the gods made man out of cornmeal (sounds stupid but I'm not sure monkeys sounds any better..lol), and ....ew..cover your ears....human. Yep, from the sacrafices. Please don't let that gross you out to continue.


Once cannibalism was outlawed, pork took it's place because...well, I won't tell you why, it may just be too much. You can also use chicken or turkey. In more recent (barely) history, Pozole was mentioned by Bernardino de SahagĂșn, a 16th century Spanish Missionary to the Aztec people.


Ironically what started out as a special occasion dish has become the pot of soup for the everyday family. It's ingredients vary according to region. Just like grandma's chicken soup in America, everyone does it differently. I'll give you my version. Play around with some others if you like, I'm sure they are all good.

Mrs. Oz Pozole


1 Pork Shoulder or Butt


1 30 oz. can Hominy


1 Head of Cabbage


1 Large white onion


3-5 cloves fresh garlic


2-4 Limes + lime juice to taste


1 Tbs. cumin


1/2 cup red chili sauce (a spicy enchilada sauce will do)


1/2 bunch of Cilantro (if you don't like cilantro one, I feel sorry for you, but two, you can use a few small cans of green chilies)


Half a stock pot of water (I don't measure water...you'll have to eye ball that one)


Salt and Pepper to taste


Pig's foot (optional)


Place pork (and pork foot should you want to use) in stock pot and cover with water till pot is at least half full. For a low fat soup, you can cook the pork till it's falling apart and refrigerate the broth. Later you can skim off the fat and continue the soup from there. Otherwise....


Remove tender pork to a large platter or bowl. Discard any bones or fat (and foot if you used it)and return meat pieces to the broth after they are separated into bite size pieces. Put on high heat and chop onion, garlic and cabbage. Add to pot followed by seasonings and red chili sauce. Drain can of hominy and add to pot. Half two limes and squeeze juice into broth (many recipes use lemon juice and serve the soup with a wedge of lime, I prefer just using lime because of it's Mexican flavor) and drop halves right into the pot for about half an hour to release lime flavor into the broth. You can skip this if it's too much for you, I came up with this myself because I love the depth of flavor it adds to the soup. Just remove the halves after they have simmered in there a while.


Cook until cabbage is tender. Chop half head of cilantro and add to soup. Taste to see if you need more lime juice (you want a bit of a tangy broth but taste to your liking) or salt and pepper.


Serve in bowls with a wedge of lime for squeezing and either corn bread or warm tortillas with butter. Pozole is great made the day ahead and then reheated. It's also great with quesadilla wedges.


Hope you enjoyed your little history lesson but try to forget it when you eat the soup. :)


I'm very exited about my next adventure. I seem to be on a soup theme without meaning to. I've been very interested about the traditional soup of Vietnam called pho (sounds like "foe"). It sounds very unique and I'm hoping to share about it next week or the week after depending on how life goes.

Monday, March 15, 2010

Menu Monday: Way Too Easy St. Patty's Day Dinner

I love holidays and many of them for food reasons, but I don't think I crave any holiday dinner like I do St. Patrick's Day fare. Turkey and sides are good but not my fav, a gorgeous ham is great but a finely cooked plate of corned beef and cabbage with a nice glass of Irish Beer is delish beyond words. The SADDEST thing ever is that some people hate it. I declare to you....if you hate it, you made it wrong! There is no way to hate this meal when it's done right. Still, it is an easy one to screw up royally and I have. I want to save you from that and take ALL the stress out of the process because I have found it one of the easiest dishes to make. WAY easier than Christmas or Thanksgiving dinner.


The fact is, corned beef on it's own is easy to get wrong, and cabbage on it's own is easy to get wrong. You don't want a tough meat, and you don't want soggy cabbage. Trust me, you're kids will learn to hate this meal if it comes out that way. I found a secret that allowed perfection ever time and my kids beg for more cabbage when it's done this way! All you need are two crock pots!


Many corned beef pkgs come with oven instructions....well, ignore them. Many call for boiling the meat which just KILLS me! Do you know what happens when you boil meat? All the flavor leaves and goes out into the water and unless you plan to make St.Patty's day SOUP, this is insane. All that briny goodness is going to be put to work to make your cabbage the best you have ever had, and you don't want to waste it! Boiled cabbage is just as gross so just throw that idea out the window as far as I'm recommending. The one time I followed their advice for the oven, I had tough meat that would not cut and no one wanted. If you have done it with success, please post your comment and suggestions and I may try again someday but my method is a "if it ain't broke, don't fix it" for me. Also, it is so easy it could make you cry.


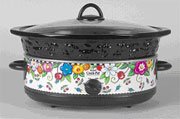
I use a very large crock pot for the meat and cabbage. I'm not sure the size, but this is the one I use:


I either use one large brisket or two small ones. Just put them from the package into the crock pot in the morning (around 8 am should do). SET ASIDE the seasoning pkg for a moment though that comes with the brisket.


Take one to two cabbages depending on size (remember, they shrink so use as much as your pot will hold..sometimes I put a heavy item on my crock lid if it's a tiny bit lifted from the cabbage to squish it down until it softens and falls...but don't leave a space or it won't cook right). Wash the cabbage and cut it in half lengthwise. Cut out the core at the bottom but only the core. Now cut each half in thirds or quarter large wedges depending on the size of the head. Take a moment to sprinkle half of the seasoning pkg on the meat. Simply keep wedges whole (separating them makes them cook too soon and the pieces fall down into the broth getting ...yep..soggy) and arrange tightly on top of the meat. Sprinkle remaining seasoning pkg. Don't add salt, or pepper or anything else! NO WATER! PLEASE....NO WATER!


Put the lid on and set on high for about a half an hour if you can and then set to low. If you are leaving just set to low. Around dinner time you should have perfectly falling apart corned beef and soft but textured and VERY flavorful cabbage. More on removing and serving below.


The potatoes should be small and red ones. Wash and half only if they are a bit large. If they are small, just leave them whole. I use my regular size crock pot for this. Mine is the blue one pictured here with the crock pot lady who btw has an great website I have down in my left hand links.


(I believe the ME one I have is comparable to the large one on the right so that gives you an idea...I'm sorry I don't have measurements for you!)


Just clean the potatoes and put them in with a pat of butter and a sprinkle of parsley if you like. Put on low and they will be perfect by dinner.


The soda bread has been my only problem. Last year I made a recipe that was more of a sweet bread and although it was good, I really wanted more authentic fare this time. I will be trying the traditional southern Ireland cake version demonstrated well here. The page also has a fun history of soda bread that you can read over or share with your kids. They usually like that kind of stuff and it makes the holiday a full adventure.


Serving the corned beef and cabbage I have a particular method that gives fuller flavor to the dish. About half an hour to an hour (depending on how well cooked your cabbage is) before serving open the crock pot and switch the order of the meat and cabbage. Just take the brisket out and let the cabbage fall down in the juices. Replace the brisket on top of the cabbage and put the lid back on. Again, don't do this long if your cabbage is pretty soft all ready. When you serve place the brisket on a platter and slice into portions. You can either surround it with the cabbage wedges and drizzle with the juices, or you can serve the cabbage in a bowl (my preference) and pour a great deal of the juices over them so they stay warm and still season at the table. The potatoes are pretty easy, just take them out and serve!


Top this off with a nice Guinness for you and the hubby and enjoy! If you like you can finish off with an authentic Irish dessert (suggestionshere (that Guinness cake looks good..mmm...or here) or just some green jello or ice cream. If you can manage an Irish cream coffee, that would be a great ending as well. Of course, put on some great Celtic sounds! Pandora is great for this and you can just start with Celtic Woman to get your station going.


We always finish off St.Patrick's Day with the reading of his story and watching the Veggie Tales short on St.Patrick found on the Sumo Of the Opera DVD. It's important, just like with the real St.Nicolas, for kids to know the heart and sacrifices these men made for the love of Christ. I believe Focus On the Family may even have a radio drama for St.Patrick. I'll have to confirm that but you may want to check out their website.


I get a special treat this year because Rick is off St. Patty's day! I'm looking forward to it and I'm planing on having the girls help me with the bread so they can learn.

Sunday, November 22, 2009

Banana Walnut Muffin Perfection

Do your bananas talk to you? Mine do. They start by speaking softly and letting me know they are not prime enough for the kids lunchboxes unless I want them to come home uneaten and oozing from their skins after being rejected on site by my children. Then they start to say "time for some baking!". Eventually if my days are busy they end up yelling at me about how I should be more convicted not to waste and let them go beyond use entirely. Finally, I give in and usually that last moment of sparing them for some noble use, they are at peek baking perfection.
Time for quick bread or muffins, but bread gets boring after a while and is not as portable for lunches or snacks. Still, my muffin history has not been a good one.
I love muffins but I don't like the way many recipes come out. Some are too wet and so the tops run, and some are too dry so they don't rise but become little bricks my kids won't eat. I tried this recipe and loved the way they came out. It was thick enough to allow for bigger muffins but not too thick to be dry.

I don't have whole wheat flour right now so I'm still needing to try it out with that but the white flour came out great.


Banana-Nut Bread (or Muffins)


  • 1-1/4c. sugar
  • 1/4 c. oil
  • 1/2 c. butter
  • 2 eggs
  • 1-1/2 c. bananas, mashed (very over ripe is best)
  • 2 c. all-purpose flour
  • 1/2 t. salt
  • 1 t. baking soda
  • 1/2 c. chopped walnuts or pecans (I used walnuts and chopped them pretty fine in my chopper)
  • 1 t. vanilla extract

Blend sugar, oil and butter together; mix in eggs and bananas. Set aside. Combine four, salt and baking soda; add to wet mixture. Stir in nuts and vanilla; pour into greased and floured loaf pan (9"x 5") or into muffin cups (for big muffins fill 3/4 full). Bake at 350 for 30-40 minutes or until knife comes clean.

Friday, November 13, 2009

Quinoa Pilaf or Stuffed Peppers


This originated as a red pepper stuffing but I liked it enough on it's own.

Here is what you will need:

2 cups dry Quinoa (sold at TJ's and health food co-op)

1 carton chicken broth (4 cups)

1 large onion (I had some small ones given to me) chopped fine

1 Carrot chopped

3-4 celery stalks chopped

1 tsp. italian herbs

1/2 tsp garlic powder

salt and pepper to taste

1/2 cup almond slivers or slices (forgot to put in picture!)

Method:

1. Rinse Quinoa. This is vital to getting off the bitter producing powder layer on the grain.

A strainer works better because the grain is so small it will fall through a colander.

2. Saute chopped veggies in olive oil till slightly tender. Season with garlic and salt and pepper and herbs.

3. Add chicken broth and rinsed Quinoa. Bring to boil and reduce to simmer. Simmer on low for about 15 minutes (covered) or until liquid is absorbed. Fluff with fork like couscous or rice.

4. Add almond slivers and toss to warm. Serve.

This makes a double batch but it's great as a cold lunch also so I make lots at a time.

Click the link to find out more about Quinoa. It's a complete protein grain and low on the glycemic index as well.

Variation: To make into stuffed peppers just fold in 1/3 or more feta cheese (or a shredded milder cheese if you like) and stuff in a sweet pepper. I used red because they are sweeter. Bake at 350 for 25 minutes or until peppers soften. I learned it's better to put them in a deep dish baker and cover with foil or the stuffing gets a little too crispy on top.

Summer Squash Strata


(Recipe taken from the Facebook group "Cooking With All Things Trader Joe's")

The recipe is very flexible. The base is a bread layer, typically a French or Italian Loaf, a brioche, or Challah. Even a few slices of wheat, multigrain, or white bread will do. . Play around with the other ingredients as well. Substitute mushrooms and spinach or broccoli florets for the vegetables, use swiss or Parmesan instead of goat cheese, or add slices of your favorite sausage.

Summer Squash Strata

3 medium zucchini or yellow crookneck squash (I used both), sliced into thin disks
1 Challah loaf (1 lb) cut 1-inch cubes or torn into small chunks
8 oz log of Chevre fresh goat cheese, broken into small chunks (or use TJ's Crumbled Goat Cheese)
2 Tbsp extra virgin olive oil, divided
1 medium yellow onion, cut in half and sliced thinly
1/3 cup Julienned Sundried Tomatoes
2 cups whole milk
6 large eggs
1/2 tsp salt
1/4 tsp ground black pepper
1/2 cup chopped fresh basil

1.) Spread the bread cubes in an oiled 9x13-inch baking dish. Scatter half the goat cheese over the bread.
2.) In a skillet over medium heat, saute the onion in 1 Tbsp oil until soft, about 4-5 minutes.
3.) Add the squash and drizzle with 1 Tbsp oil, sauteing for an additional minute.
4.) Spread vegetables on the bread layer, scattering sundried tomatoes and the remaining goat cheese over the top.
5.) Whisk together the milk, eggs, salt, and pepper. Pour this mixture evenly over the top of the ingredients in the baking dish. Press down gently just a little, allowing the bread to soak up the mixture.
6.) Let the dish sit 10 minutes while you preheat oven to 350 degrees.
7.) Bake uncovered for 40-45 minutes. You will know when it's done because it will puff up quite a bit. Remove and let rest for 5-10 minutes (it will deflate back down). Sprinkle with fresh basil and serve.
My (veggie mama's) alkaline adjustments:
soy milk instead of whole
use sprouted wheat bread instead of italian or french
Serve with large spinach salad

Serves 8
Note: I will be using Feta instead of Goat Cheese for cost. Goat cheese is actually a lower acid cheese though and would be a smart choice. Feta is better also and cheaper.

Thursday, November 12, 2009

Sunday Afternoon Pasta

You have to think of pasta like pizza. Pick your toppings so to speak. I love the versatility of pasta for that. Today we came home from church and it was sooooo hot. Boiling something for 15 minutes was the extent of the kitchen heat I wanted to generate and the results were wonderful.
Sunday Afternoon Pasta
1 pkg WW Penne pasta cooked
3/4 jar Trader Joe's Juliane Sun dried tomatoes (let the oil fall in with them)
4oz Trader Joe's Columbus Dry Salami cut in slivers
1 Trader Joe's Can of Artichokes, sliced
1/2 pkg Trader Joe's Basil (layer the leaves, roll them up and then slice thin strips)
1/2 cup (yes happened to be TJ's!) Parmesan cheese grated or shredded
1/2 cup Kamalata Olives
Salt and Pepper to taste
Garlic Powder to taste
1 tsp Trader Joe's Pasta Seasoning Mix (or a good Italian herb blend)

Place all additions in a large bowl and throw strained hot past on top. Toss to coat and sprinkle with the Parmesan.
Yum.

Got Chorizo?


Feels good to be back on this blog, it's been a while! Life has been full since school began.


This week I made two dishes with Mexican Chorizo. I've used it before and always love the depth of flavor it gives a dish but this week I went on inspiration alone. No googling for the recipe, just what I thought would work and it was yummy.


Mexican Chili (Large Family size)

5 Cups Dry Pinto Beans Cooked (with broth)

2 lbs. Beef Chorizo (Food For Less Beef Version made there but you could use prepackaged I suppose)

2 Cans Stewed Tomatoes w/ Chilies

1/2 bag frozen Trader Joe's Sweet Corn (or use a whole bag if you like)

1 Chopped Onion

2 Tbs. Chili Powder

1 Tbs. Garlic Powder

Salt and Pepper to taste


Cook Chorizo in a skillet and add to stew pot or large Crock Pot. Add all other ingredients cook till corn and onions are tender. For Crock Pot you can leave on warm for the day or afternoon. It depends on how hot your pot gets but don't put it on high or it will burn. The dish is all ready pretty much ready except for the veggies and the spices working through and getting "happy".


Mexican Egg Bake


1 tube pork chorizo

1 can green chilies

1 cup shredded cheddar cheese

12 eggs

1/2 cup milk

1 tsp salt

3 flour (or 4-5 corn) tortillas cut in cubes (I use a Pampered Chef Pizza cutter to do strips and then turn the strips to make cubes)


Cook chorizo in skillet. Scoop into 13X9 baking dish leaving as much of the chorizo fat in the pan still. Saute the tortilla cubes in chorizo fat till coated a bit and a little crispy. Scatter on top of cooked chorizo in baking dish.

In a large bowl beat eggs, add salt, chilies, and cheese one at a time. Pour over chorizo and tortillas and bake for 30- 40 min. at 350 or until egg is cooked. Overcooking will dry it so watch out!
Related Posts with Thumbnails